
The Basics of Saddle Stitching
Saddle-stitching is the easiest way to secure a book, together. The process is simple and the machinery involved is less complicated and compact.
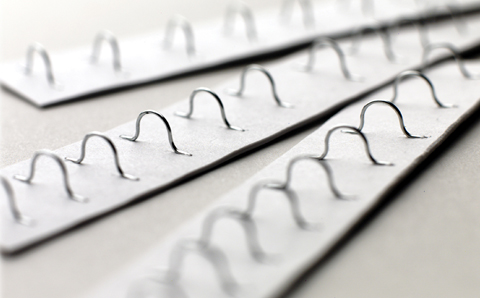
The process involves bending a fixed length of wire and forcing it through the pages and clinching the legs to form a stitch.
It is a cheaper process compared to other forms of binding. You can do approx. 12,000 stitches with 1 kg of wire. Also the machine consumes less space.
Saddle stitching basics
Saddle stitching is done to print jobs in which the spine thickness does not exceed 1 cm.
The wire used for stitching is available in various thicknesses (gauge). The choice of wire is made according to the type of job (the thickness of spine and sheets). For thicker jobs thicker wire may be used since the wire has to penetrate the sheets.
The stitcher head is made to handle wire within certain range of thickness. The stitcher head consists of the following components:
- Wire Straightener: The wire which is drawn out of the spool is straightened
- Cutter: This cuts the wire to a fixed length to form a stitch
- Stitcher Head: It bends the wire to form the crown and legs
- Clincher: It bends the legs of the bent wire from the bottom to form a stitch
Basics for a good quality stitch
Good wire: Wires are normally galvanized. Some-times poor galvanizing creates problems with wire draw. The metal plating on the wire can come off in the straightener. his creates a jam and offers resistance which in turn affects the wire draw and life of the stitcher head.
When wire is manufactured it is wound on a large spool; only to be rewound and supplied in smaller spool to fit in the machine. Wire in the smaller spool, if stored for many days, (gets aged ) starts to remember its shape in the spool. Such a wire would offer a lot of resistance to straightening and wire draw. To check the suitability of the wire, draw and cut about a metre length. The wire should coil back to form the size of a football (i.e. larger then the spool from which it has been drawn). Nearly half the problems associated to stitching would disappear when you replace an old stock of wire with a fresh spool.
Consistent wire draw: The stitcher head should be able to draw fixed length of wire consistently. You should check the length of wire by drawing them through the stitcher and taking it out after cut. Take about 15 pieces and check if all are equal in length. If it is unequal the quality of stitch will be affected.
You can also check the wire after bending, but before clinching, to see if both the legs have equal length. If the legs are unequal, they would either overlap or have significant gap between them. Both these conditions are not acceptable.
Good cut: There should not be any burr at the edge of the wire when the cut is made. Ensure that you change the cutter when it starts to give burr at the cut.
Centered wire: All stitcher head parts should be properly set according to wire gauge so that the wire is centered correctly in the stitcher head.
Clinching: Finally the clinching should be accurate with the correct amount of pressure. The clincher should be clean and devoid of any paper dust.